Vacuum Casting
Vacuum casting technology is to use the product prototype (such as SLA or CNC) to make a silicone mold in a vacuum state, and pour the liquid PU material in a vacuum state to make a replica that is identical to the product prototype; vacuum molding technology can be used to change the material of the product prototype, assemble prototypes or small batch production of products.
Core features and advantages of vacuum molding
- Silicon mold
- Using flexible silicone molds (usually reproduced from 3D printed or CNC machine), high-fidelity replication can be achieved, and complex details (such as textures and undercut structures) can be reproduced.
- The mold life is usually 10~30 times (depending on the material and process), suitable for small batches (tens to hundreds of pieces).
- Vacuum injection molding
- Injection molding in a vacuum box can reduce bubbles and improve the surface quality of parts
- Material diversity
- PU ) resin such as ABS , PP , PC , and rubber.
- Special materials such as transparent, high temperature resistant, high toughness, and flame retardant are available.
- Fast delivery
- The silicone mold production cycle is short ( 1 to 3 days), which is suitable for rapid iteration of product design.
- Low-cost small batch production
Compared with traditional injection molding (steel / aluminum molds), silicone molds are extremely low in cost and suitable for small batches of 10 to 500 pieces .
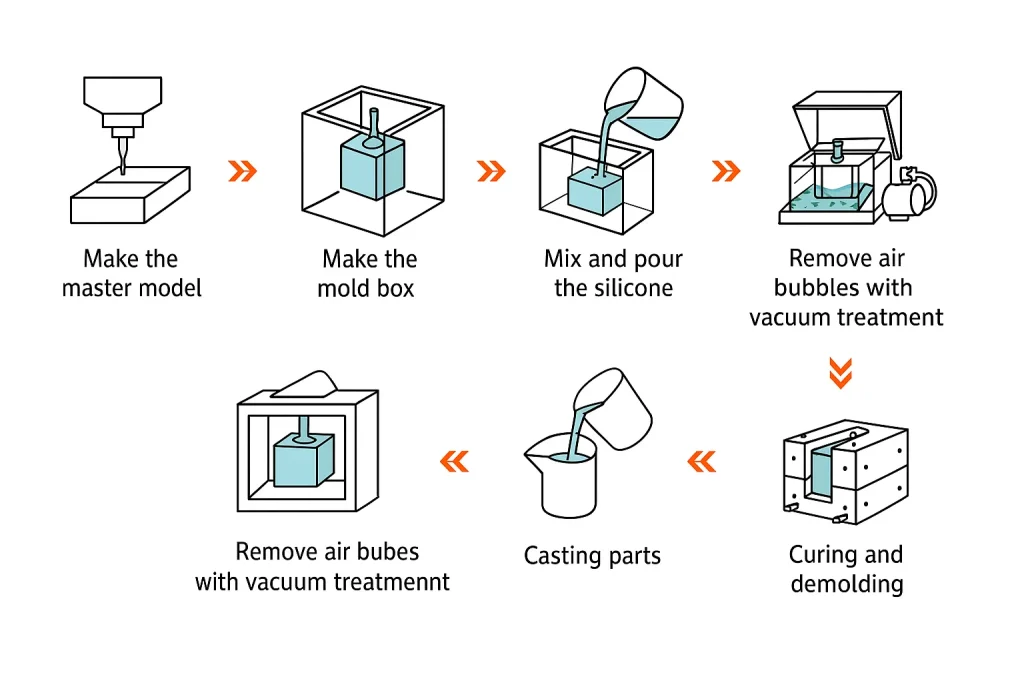
Vacuum molding steps:
1. Make a prototype (master mold)
- Note : Use 3D printing or CNC machining to make the original model, ensuring a smooth surface and clear details.
- Key point : The quality of the prototype directly affects the final mold effect.
2. Make a silicone mold
- Instructions : Place the prototype into the mold frame, pour in liquid silicone, vacuum to remove bubbles, and cut open the prototype after curing.
- Key points : Vacuum degassing ensures that the mold is defect-free, and the parting line design facilitates demoulding.
3. Casting materials
- Note : Mix PU resin and inject them into the silicone mold, and then vacuum it again to remove bubbles.
- Key Point : Material selection affects part performance (e.g. hardness, temperature resistance).
4. Curing and molding
- Note : Place in a constant temperature environment for curing (usually 2-4 hours), and demould after the material is completely hardened.
- Key point : Temperature and time control determine the strength of the finished product.
5. Post-processing
- Note : Cut off the flash and perform surface treatment such as painting and electroplating (optional).
- Key point : Improve appearance and assembly accuracy.